SKU: OT6745 Varenummer: XV193 EAN: 8720828223635

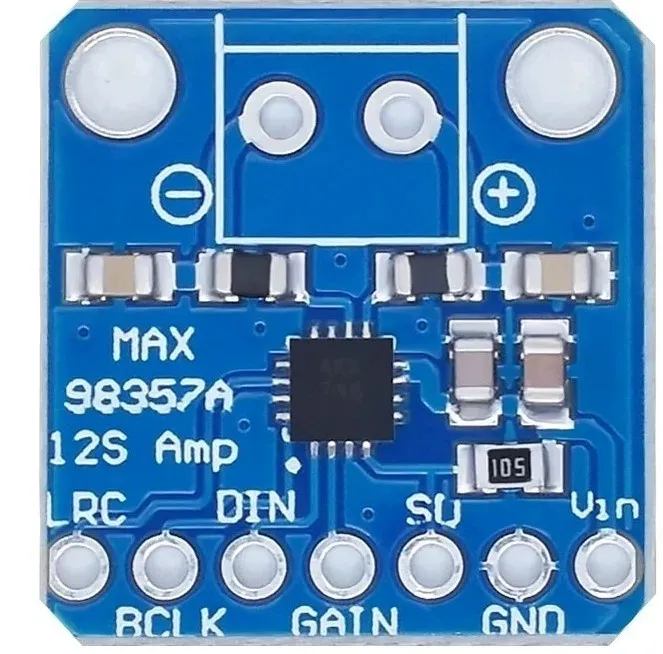
Hvis du leder efter en nem og prisvenlig måde at forstærke dine digitale lydfiler på, så er MAX98357 I2S Amp Breakout noget for dig. Den tager standard I2S digital lydindgang og dekoder den ikke kun til analog, men forstærker den også direkte til en højttaler. Perfekt til at tilføje kompakt forstærket lyd, den kombinerer 2 break-outs (I2S DAC + Amp) i én.
I2S er en digital lydprotokol, der bruges på printkort til at overføre lyddata. Mange avancerede chips og processorer håndterer al lyd i digital I2S-format. For at ind- eller udlæse data bruges tre eller fire pinde (data in, data out, bit clock og left-right channel select). Typisk er der til lydudstyr en DAC-chip, der taler I2S og omdanner det til analogt signal, som kan drive et headset.
Denne lille mono-forstærker er overraskende kraftig - den kan levere 3.2 watt til en højttaler med en impedans på 4 ohm (ved 5V forsyning og 10% THD). I den miniature chip sidder en klasse D-controller, som arbejder ved en forsyningsspænding på 2.7V-5.5VDC. Da forstærkeren er klasse D, er den usædvanligt effektiv, hvilket gør den perfekt til bærbare og batteridrevne projekter. Den har indbygget termisk beskyttelse og overstrømsbeskyttelse, men vi bemærkede næsten ikke, at den blev varm.
Lydindgangen er I2S-standard, du kan bruge 3.3V eller 5V logiske data. Udgangene er "Bridge Tied" - det betyder, at de er tilsluttet direkte til udgangene, uden forbindelse til jord. Udgangen er en ~300KHz firkantbølge-PWM, som derefter 'gennemsnittes' af højttalerspolen - de høje frekvenser høres ikke. Alt det ovenstående betyder, at du ikke kan tilslutte udgangen til en anden forstærker, den skal drive højttalerne direkte.
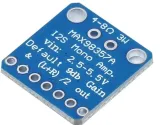
Der er en Gain-pin, som kan justeres for at ændre forstærkningen. Som standard giver forstærkeren dig 9 dB forstærkning. Ved at tilslutte en pull-up- eller pull-down-modstand, eller ved at forbinde den direkte, kan Gain-pinnen indstilles til 3 dB, 6 dB, 9 dB, 12 dB eller 15 dB.
ShutDown/Mode-pinnen kan bruges til at sætte chippen i dvaletilstand eller til at vælge, hvilken I2S-lydkanal der sendes til højttaleren. Som standard sender forstærkeren en (L+R)/2 stereomix ud til mono-udgangen. Ved at tilføje en modstand kan du ændre det til kun venstre eller kun højre ud.
Specifikationer:
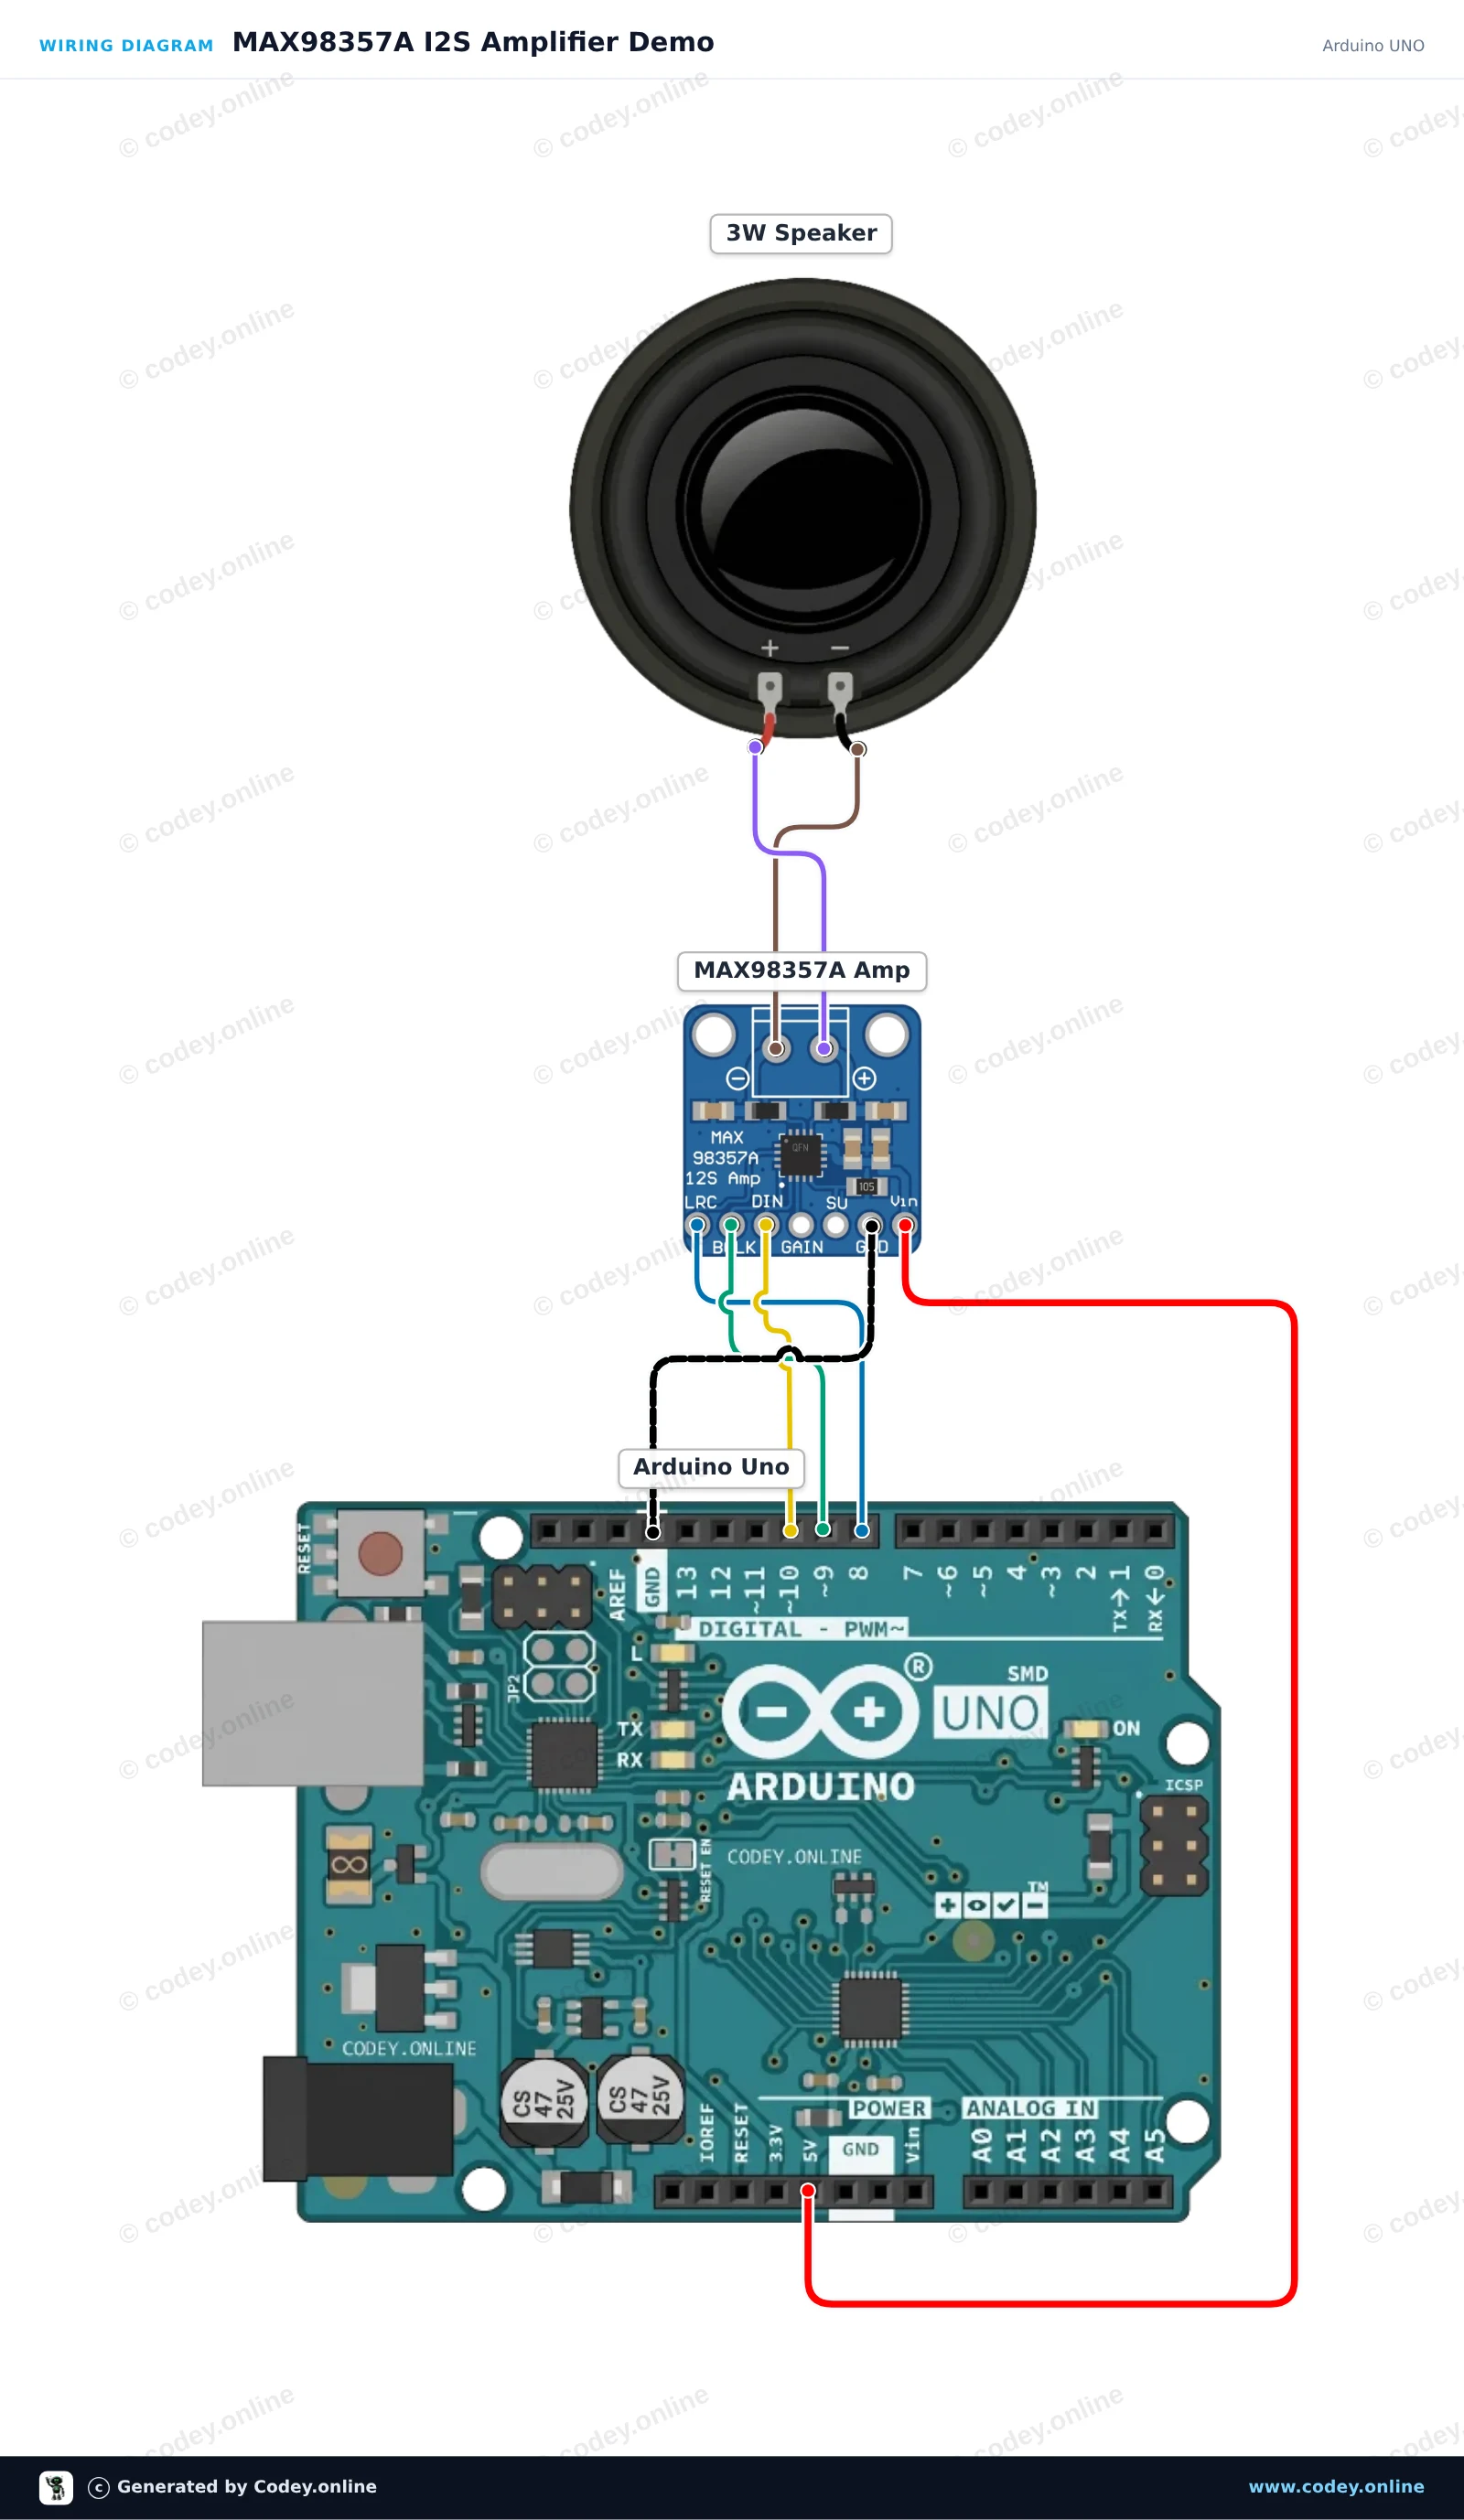
Sådan tilslutter du I2S DAC med 3W forstærker - MAX98357A til en Arduino UNO eller ESP32, med en eksempelsketch, du kan uploade med det samme.
Dette projekt viser MAX98357A I2S-forstærkeren tilsluttet en Arduino Uno og en 3W-højttaler. Da den AVR-baserede Arduino Uno ikke har en indbygget I2S-periferi, demonstrerer sketchen interface-tilslutningen ved at skifte kontrol- og datapins og vise statusmeddelelser i Serial Monitor ved 115200 baud.
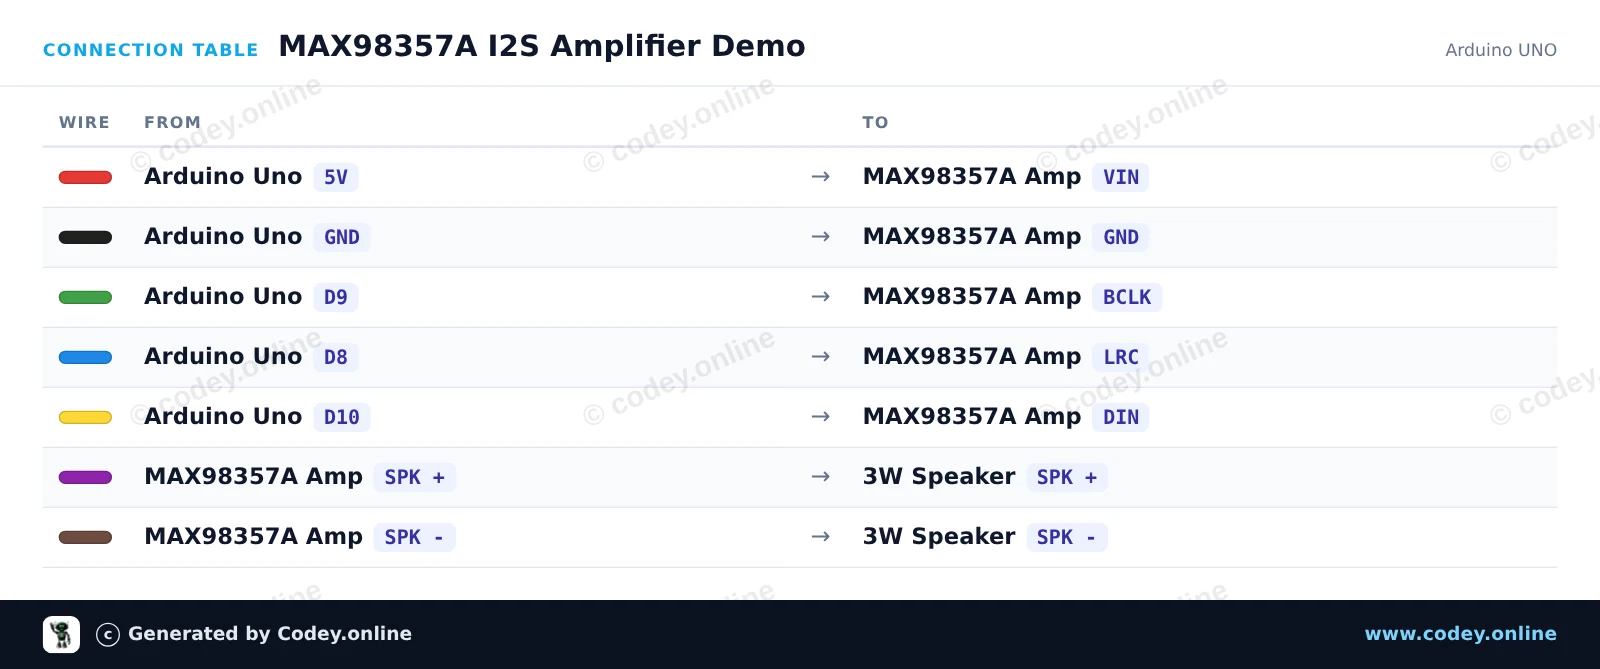
/*
 * ==================================================================
 *  Generated by Codey.online  —  https://www.codey.online
 * ==================================================================
 *  Project   : MAX98357A I2S Amplifier Demo
 *  Board     : Arduino UNO (arduino:avr:uno)
 *  Parts     : 3W amplifier MAX98357A I2S DAC
 *  Libraries : none (built-in)
 *
 *  Codey Online is an AI-powered browser IDE for Arduino and ESP32.
 *  Describe your project and Codey writes the code, draws the wiring
 *  diagram and uploads it to your board, straight from the browser.
 *  This code is free to use, modify and share, without warranty.
 * ==================================================================
 */

// MAX98357A I2S Amplifier wiring and basic test sketch
// Note: AVR Arduino Uno does not have hardware I2S.
// This sketch verifies pin connections and demonstrates signal pulsing.

const uint8_t PIN_BCLK = 9;
const uint8_t PIN_LRC  = 8;
const uint8_t PIN_DIN  = 10;

const unsigned int toneHz = 440;
const unsigned long toneOnMs = 1000;
const unsigned long toneOffMs = 500;

void outputPulse(unsigned long durationMs, unsigned int frequencyHz) {
  unsigned long start = millis();
  unsigned long halfPeriodUs = 500000UL / frequencyHz;

  while (millis() - start < durationMs) {
    digitalWrite(PIN_DIN, HIGH);
    delayMicroseconds(halfPeriodUs);
    digitalWrite(PIN_DIN, LOW);
    delayMicroseconds(halfPeriodUs);
  }
}

void setup() {
  pinMode(PIN_BCLK, OUTPUT);
  pinMode(PIN_LRC, OUTPUT);
  pinMode(PIN_DIN, OUTPUT);

  digitalWrite(PIN_BCLK, LOW);
  digitalWrite(PIN_LRC, LOW);
  digitalWrite(PIN_DIN, LOW);

  Serial.begin(115200);
  Serial.println(F("MAX98357A Amplifier Test"));
  Serial.println(F("Pins initialized: BCLK=9, LRC=8, DIN=10"));
}

void loop() {
  Serial.println(F("Signal ON (440 Hz pulse)"));
  outputPulse(toneOnMs, toneHz);

  Serial.println(F("Signal OFF"));
  digitalWrite(PIN_DIN, LOW);
  delay(toneOffMs);
}Wiring diagram and example code generated by Codey.online — https://www.codey.online
Dette projekt afspiller skiftende lydtoner gennem en 3W-højttaler med den digitale I2S-lydforstærker MAX98357A. ESP32 syntetiserer 16-bit PCM-lyd i realtid og sender den direkte til DAC-forstærkeren via I2S-bussen.
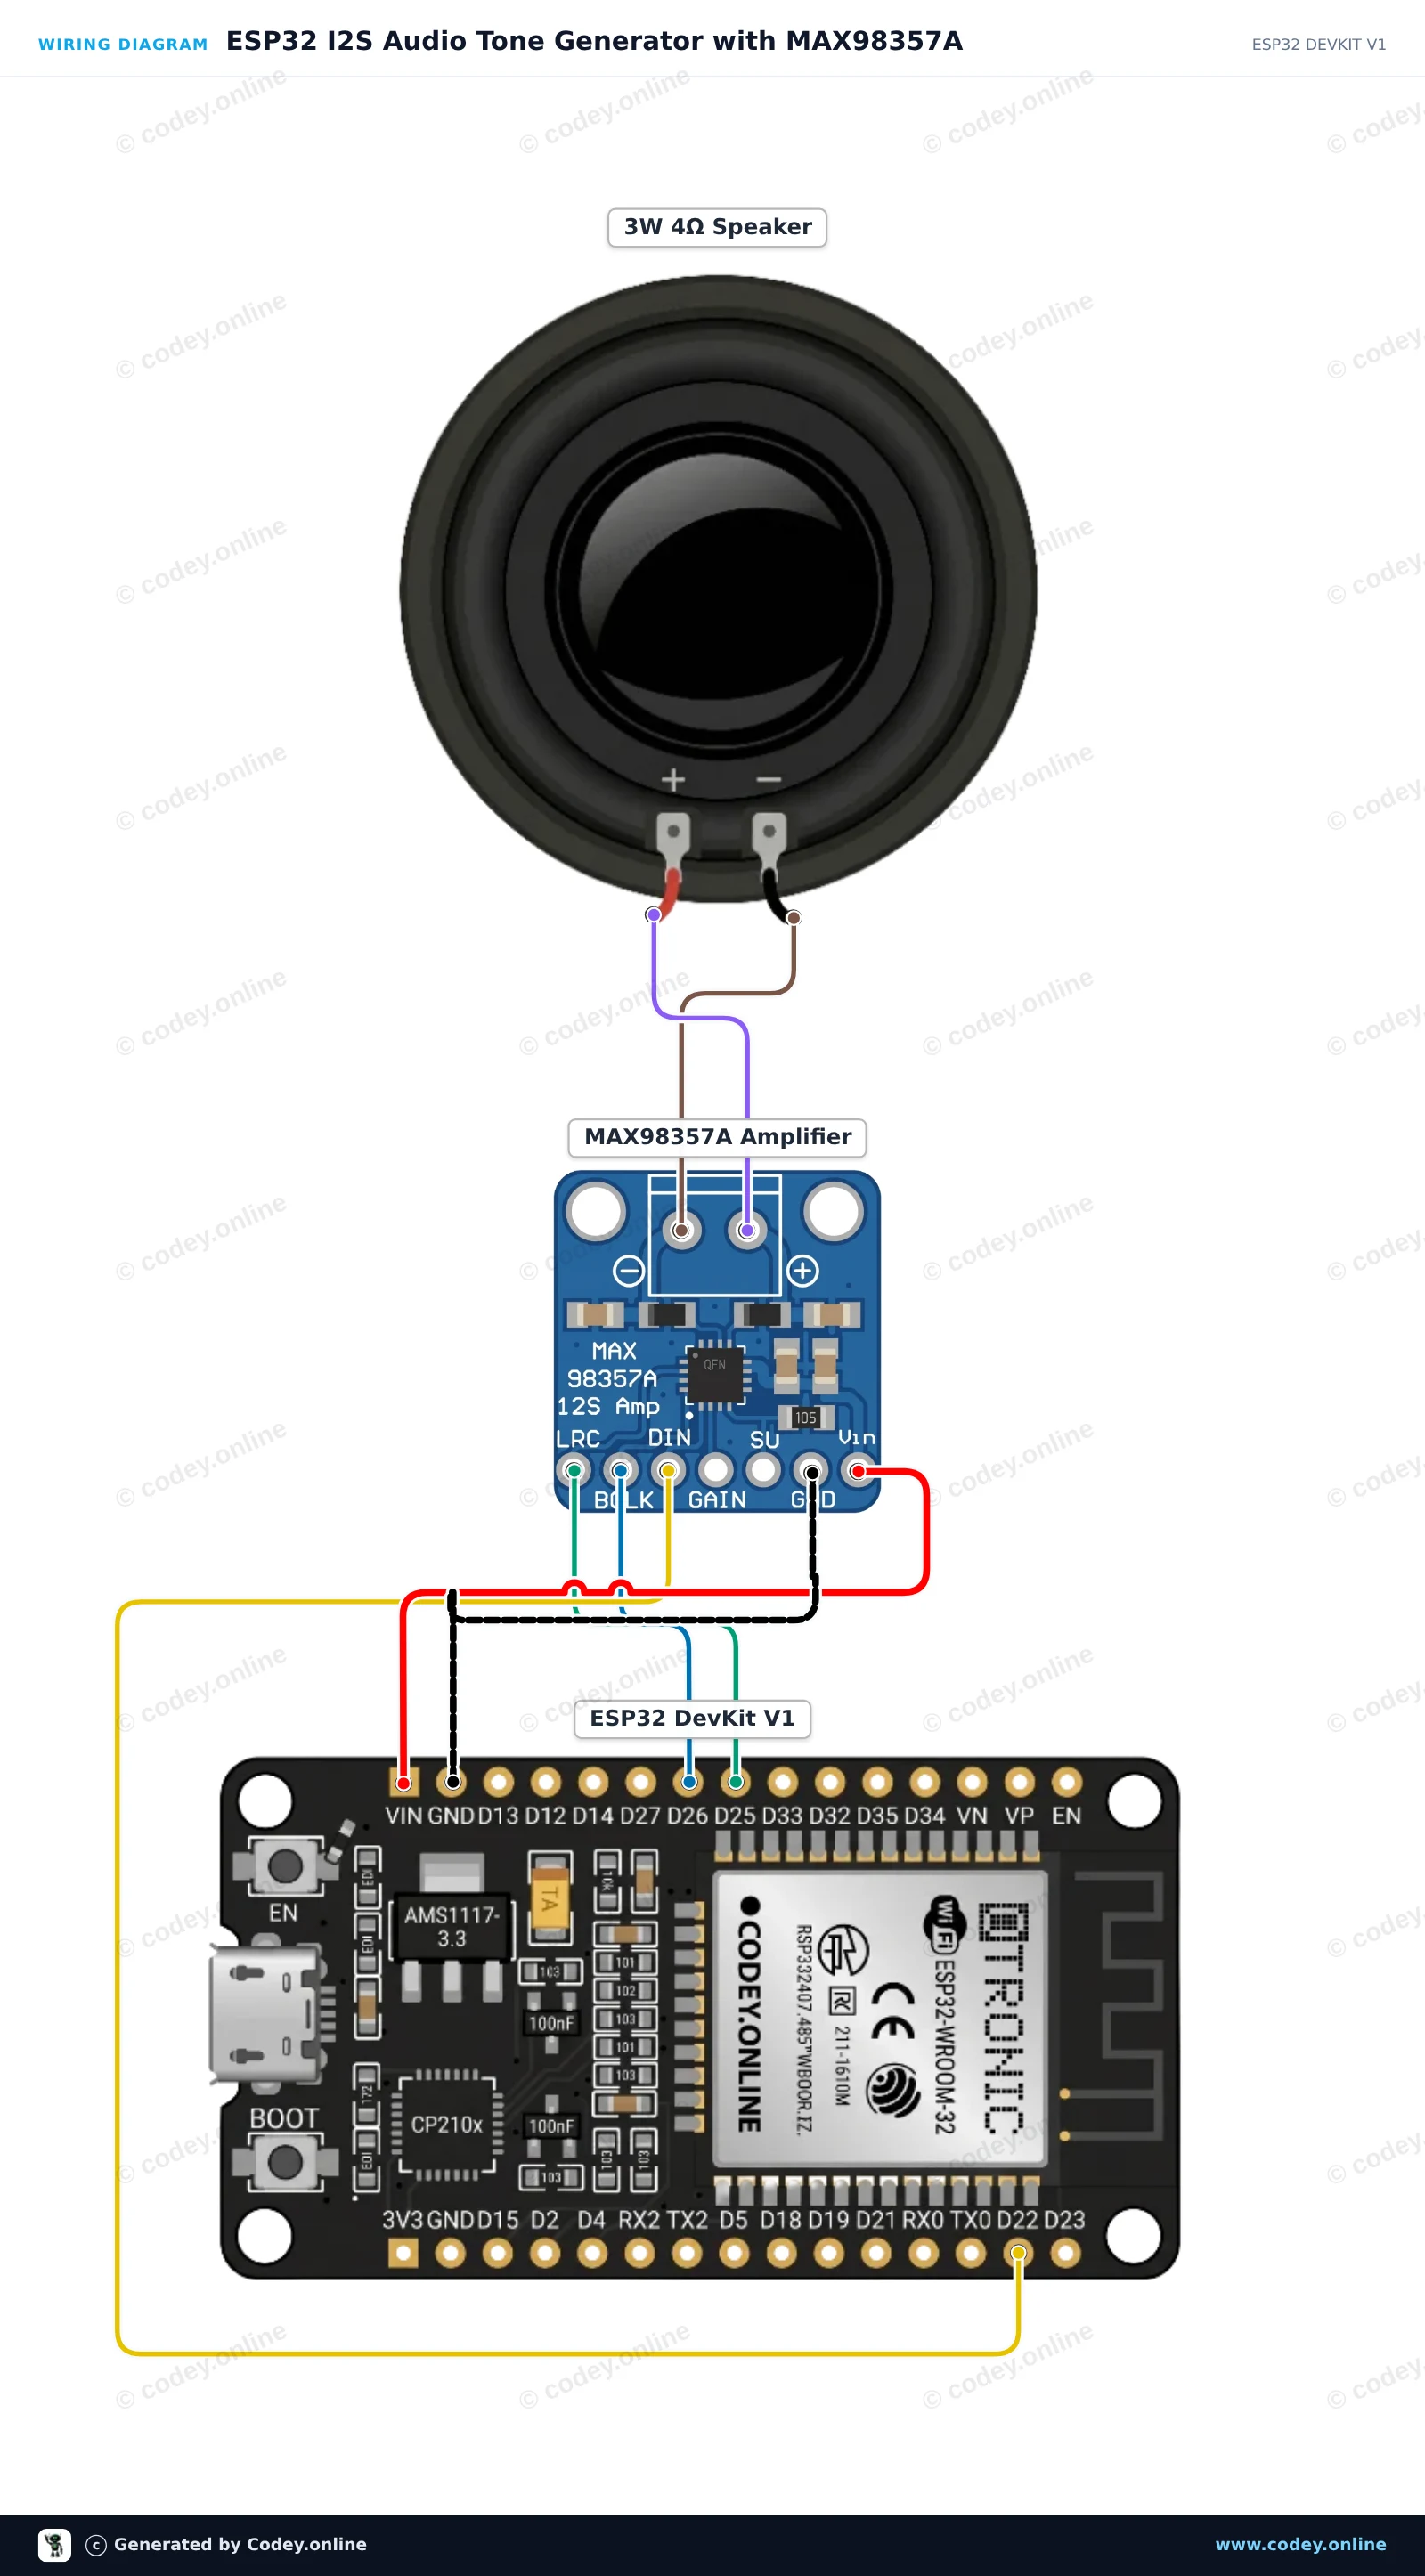
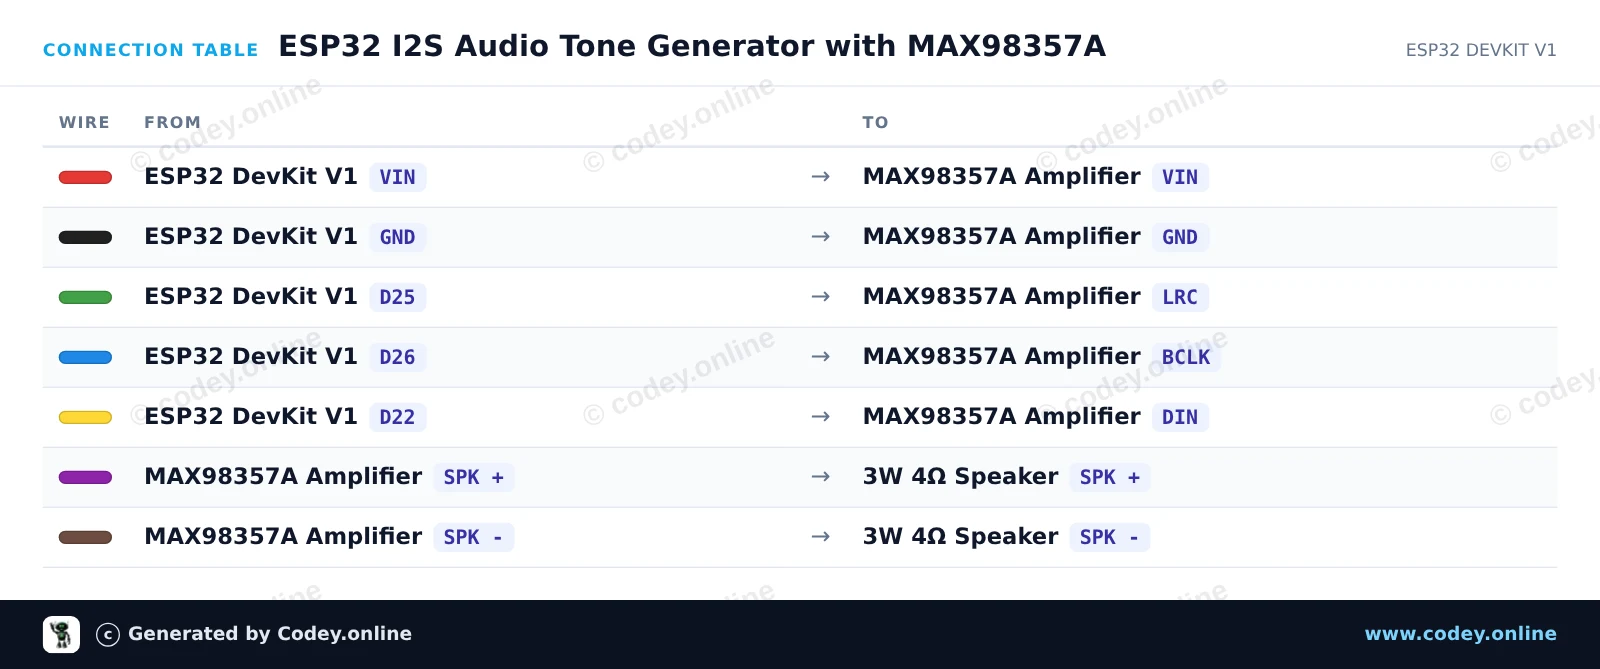
/*
 * ==================================================================
 *  Generated by Codey.online  —  https://www.codey.online
 * ==================================================================
 *  Project   : ESP32 I2S Audio Tone Generator with MAX98357A
 *  Board     : ESP32 DEVKIT V1 (esp32:esp32:esp32doit-devkit-v1)
 *  Parts     : 3W amplifier MAX98357A I2S DAC
 *  Libraries : none (built-in)
 *
 *  Codey Online is an AI-powered browser IDE for Arduino and ESP32.
 *  Describe your project and Codey writes the code, draws the wiring
 *  diagram and uploads it to your board, straight from the browser.
 *  This code is free to use, modify and share, without warranty.
 * ==================================================================
 */

#include <Arduino.h>
#include "driver/i2s.h"
#include <math.h>

#define I2S_BCLK 26
#define I2S_LRC  25
#define I2S_DIN  22

#define SAMPLE_RATE 44100

void setup() {
  Serial.begin(115200);

  i2s_config_t i2s_config = {
    .mode = (i2s_mode_t)(I2S_MODE_MASTER | I2S_MODE_TX),
    .sample_rate = SAMPLE_RATE,
    .bits_per_sample = I2S_BITS_PER_SAMPLE_16BIT,
    .channel_format = I2S_CHANNEL_FMT_RIGHT_LEFT,
    .communication_format = I2S_COMM_FORMAT_STAND_I2S,
    .intr_alloc_flags = ESP_INTR_FLAG_LEVEL1,
    .dma_buf_count = 8,
    .dma_buf_len = 64,
    .use_apll = false,
    .tx_desc_auto_clear = true
  };

  i2s_pin_config_t pin_config = {
    .bck_io_num = I2S_BCLK,
    .ws_io_num = I2S_LRC,
    .data_out_num = I2S_DIN,
    .data_in_num = I2S_PIN_NO_CHANGE
  };

  i2s_driver_install(I2S_NUM_0, &i2s_config, 0, NULL);
  i2s_set_pin(I2S_NUM_0, &pin_config);

  Serial.println("MAX98357A I2S Tone Generator Ready!");
}

void playTone(float freq, int durationMs) {
  int totalSamples = (SAMPLE_RATE * durationMs) / 1000;
  size_t bytesWritten;
  int16_t buffer[128];

  float phaseStep = 2.0 * PI * freq / SAMPLE_RATE;
  float phase = 0.0;

  int samplesRemaining = totalSamples;
  while (samplesRemaining > 0) {
    int toWrite = min(64, samplesRemaining);
    for (int i = 0; i < toWrite; i++) {
      int16_t sample = (int16_t)(sin(phase) * 6000.0);
      buffer[i * 2] = sample;     // Left channel
      buffer[i * 2 + 1] = sample; // Right channel
      phase += phaseStep;
      if (phase >= 2.0 * PI) phase -= 2.0 * PI;
    }
    i2s_write(I2S_NUM_0, buffer, toWrite * sizeof(int16_t) * 2, &bytesWritten, portMAX_DELAY);
    samplesRemaining -= toWrite;
  }
}

void loop() {
  Serial.println("Playing 440 Hz (A4)...");
  playTone(440.0, 400);
  delay(100);

  Serial.println("Playing 880 Hz (A5)...");
  playTone(880.0, 400);
  delay(1000);
}Wiring diagram and example code generated by Codey.online — https://www.codey.online





 English
  Nederlands
  Frans
Frans  Deutsch
  Italiano
  Español
  Suomi
Suomi  Polski
  Ελληνικά
  Български
  Čeština
  Hrvatski
  Svenska
  Aileen