SKU: OT2044-D79 Varenummer: AA440 EAN: 8720589817333

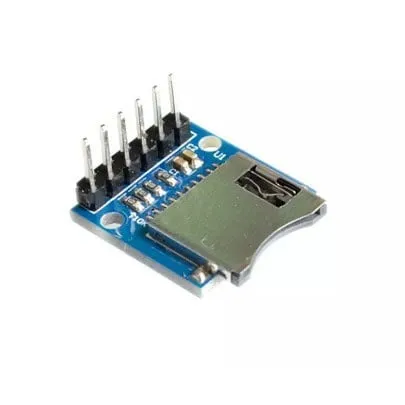
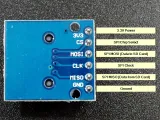
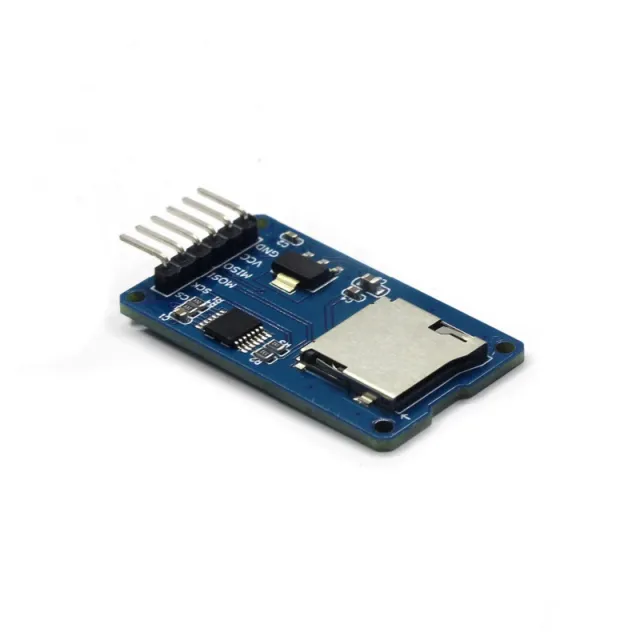
Enkel MicroSD-kortlæsermodul. Takket være drift ved 3.3V er den velegnet til f.eks. ESP32 eller ESP8266. Modulet er udstyret med de nødvendige 10K pull-up modstande på datalinjerne.
Specifikationer:
– Driftsspænding: 3.3V
- Type micro SD-slot: Push-Pull
– Interface: SPI
– Operating voltage (logic level): 3.3V
Pin headers er allerede loddet på.
Afmetingen
Lengte: 2cm
Breedte: 1,8cm
Hoogte: 1,1cm
Sådan tilslutter du 3.3V Micro SD-kortmodul til ESP32 | ESP8266 til en Arduino UNO eller ESP32, med en eksempelsketch, du kan uploade med det samme.
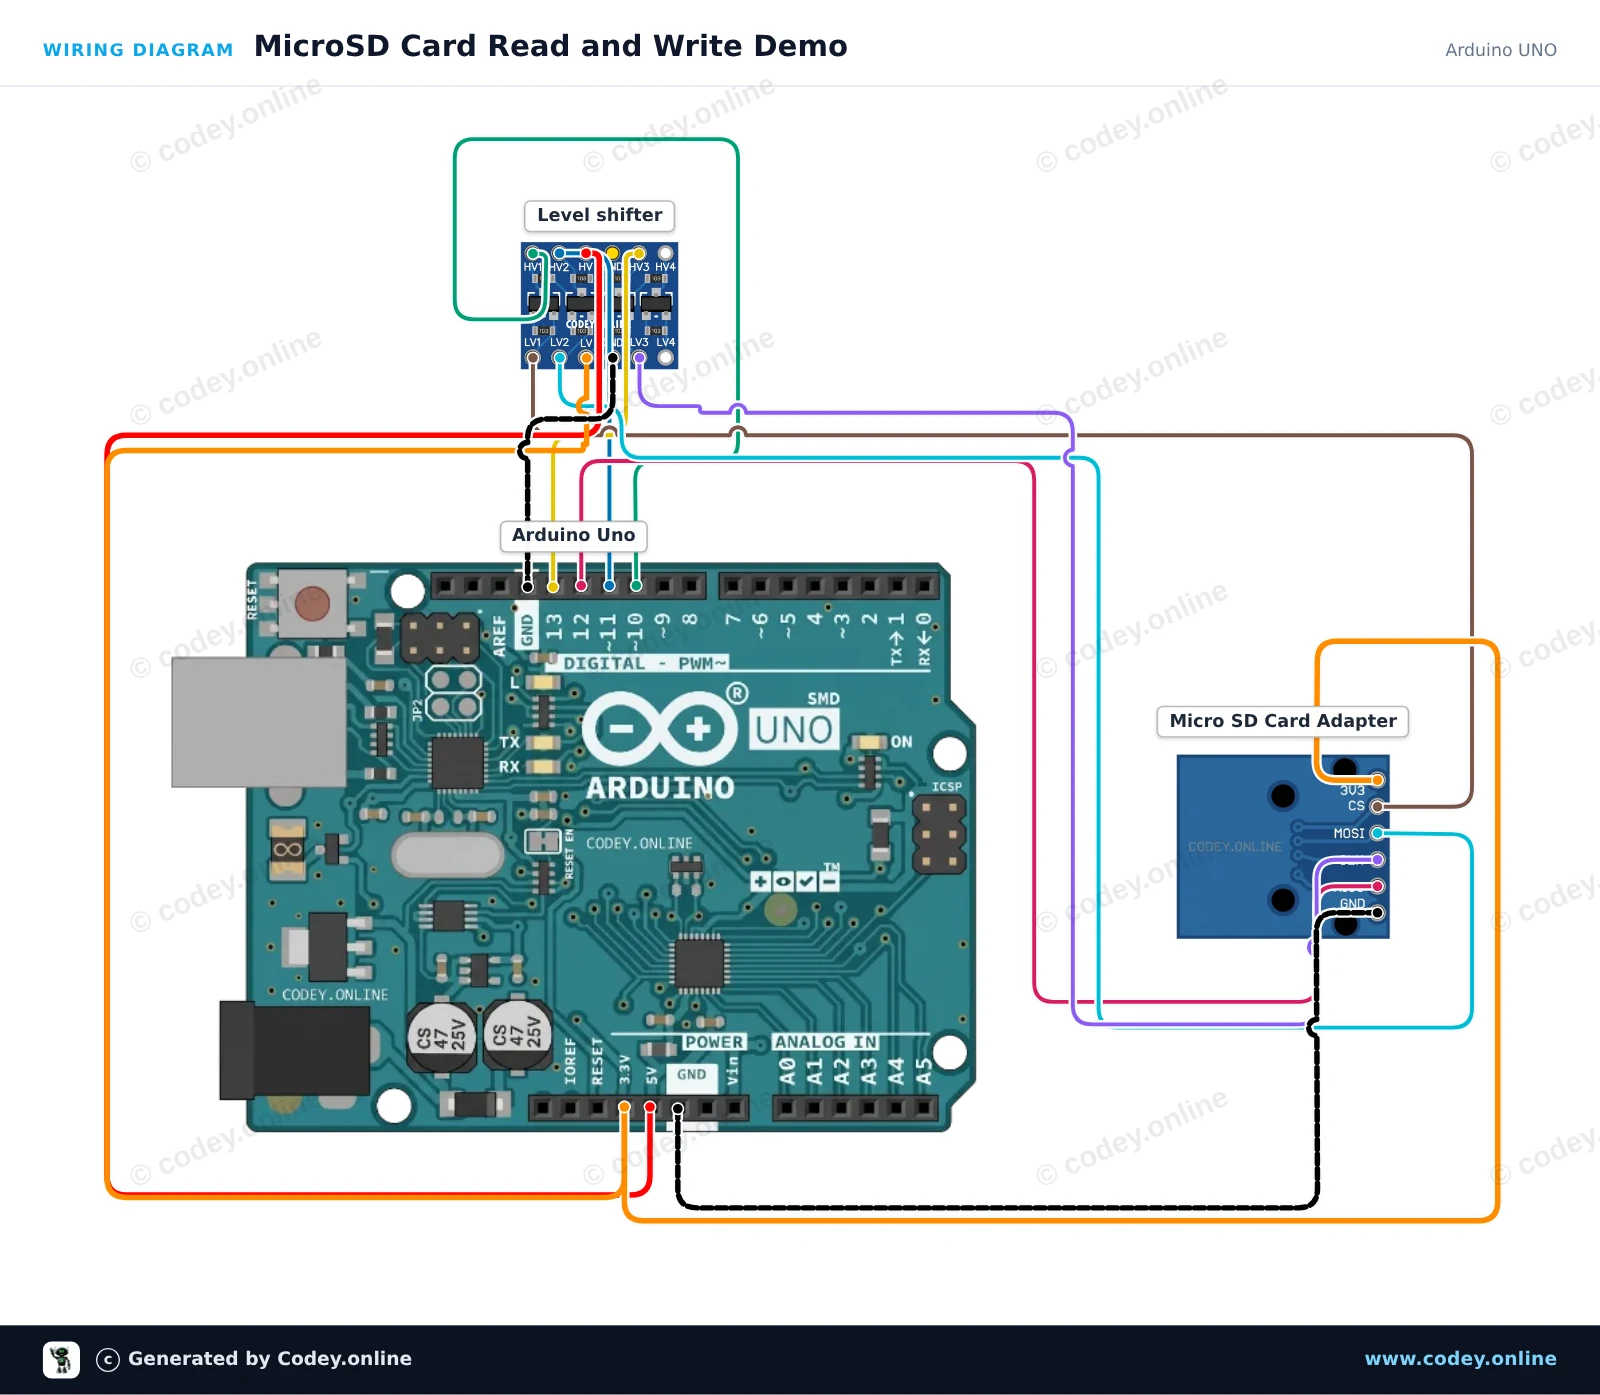
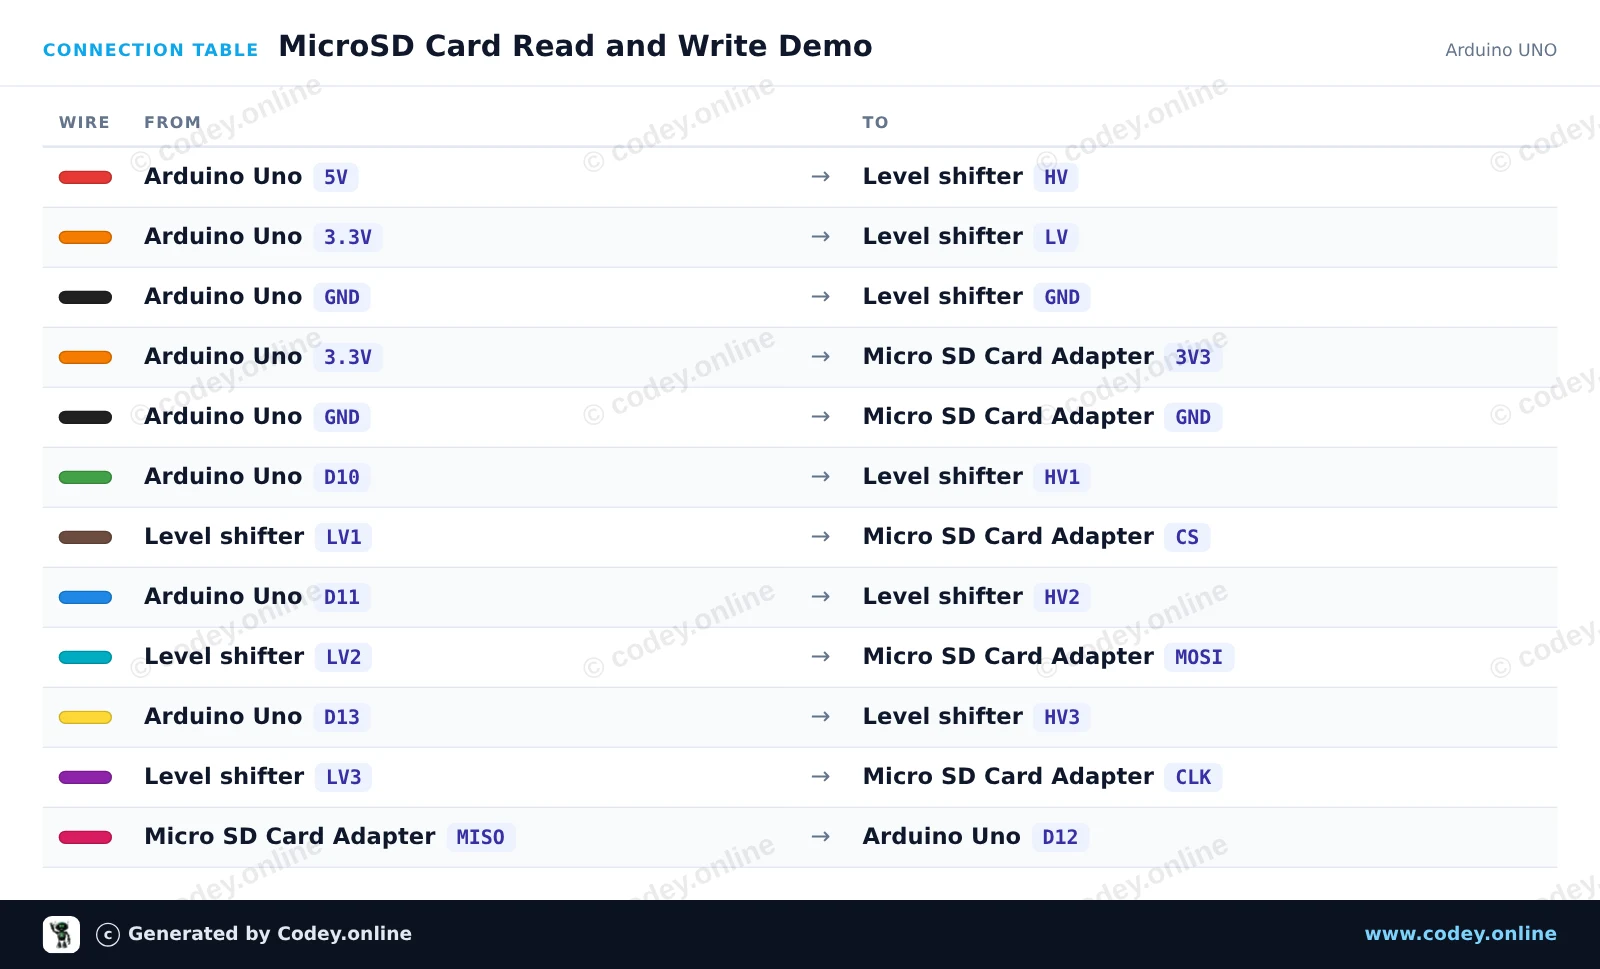
Dette projekt viser, hvordan man skriver tekst til et microSD-kort og læser det tilbage via SPI. En 4-kanals logic level shifter omsætter Arduino Unos 5V-logiksignaler sikkert til 3.3V for microSD-kortmodulet. Åbn Serial Monitor ved 115200 baud for at se initialiseringsstatus og filindholdet.
/*
 * ==================================================================
 *  Generated by Codey.online  —  https://www.codey.online
 * ==================================================================
 *  Project   : MicroSD Card Read and Write Demo
 *  Board     : Arduino UNO (arduino:avr:uno)
 *  Parts     : Micro SD Card Adapter Module 3.3V
 *  Libraries : none (built-in)
 *
 *  Codey Online is an AI-powered browser IDE for Arduino and ESP32.
 *  Describe your project and Codey writes the code, draws the wiring
 *  diagram and uploads it to your board, straight from the browser.
 *  This code is free to use, modify and share, without warranty.
 * ==================================================================
 */

#include <SPI.h>
#include <SD.h>

const int chipSelect = 10;

void setup() {
  Serial.begin(115200);
  while (!Serial) {
    ; // Wait for serial port to connect
  }

  Serial.println(F("Initializing SD card..."));

  if (!SD.begin(chipSelect)) {
    Serial.println(F("Initialization failed! Check connections & SD card."));
    return;
  }
  Serial.println(F("Initialization done."));

  // Write to file
  File myFile = SD.open("demo.txt", FILE_WRITE);
  if (myFile) {
    Serial.println(F("Writing to demo.txt..."));
    myFile.println(F("MicroSD card read/write test successful!"));
    myFile.close();
    Serial.println(F("Done writing."));
  } else {
    Serial.println(F("Error opening demo.txt for writing."));
  }

  // Read from file
  myFile = SD.open("demo.txt");
  if (myFile) {
    Serial.println(F("Contents of demo.txt:"));
    while (myFile.available()) {
      Serial.write(myFile.read());
    }
    myFile.close();
  } else {
    Serial.println(F("Error opening demo.txt for reading."));
  }
}

void loop() {
  // Idle
}Wiring diagram and example code generated by Codey.online — https://www.codey.online
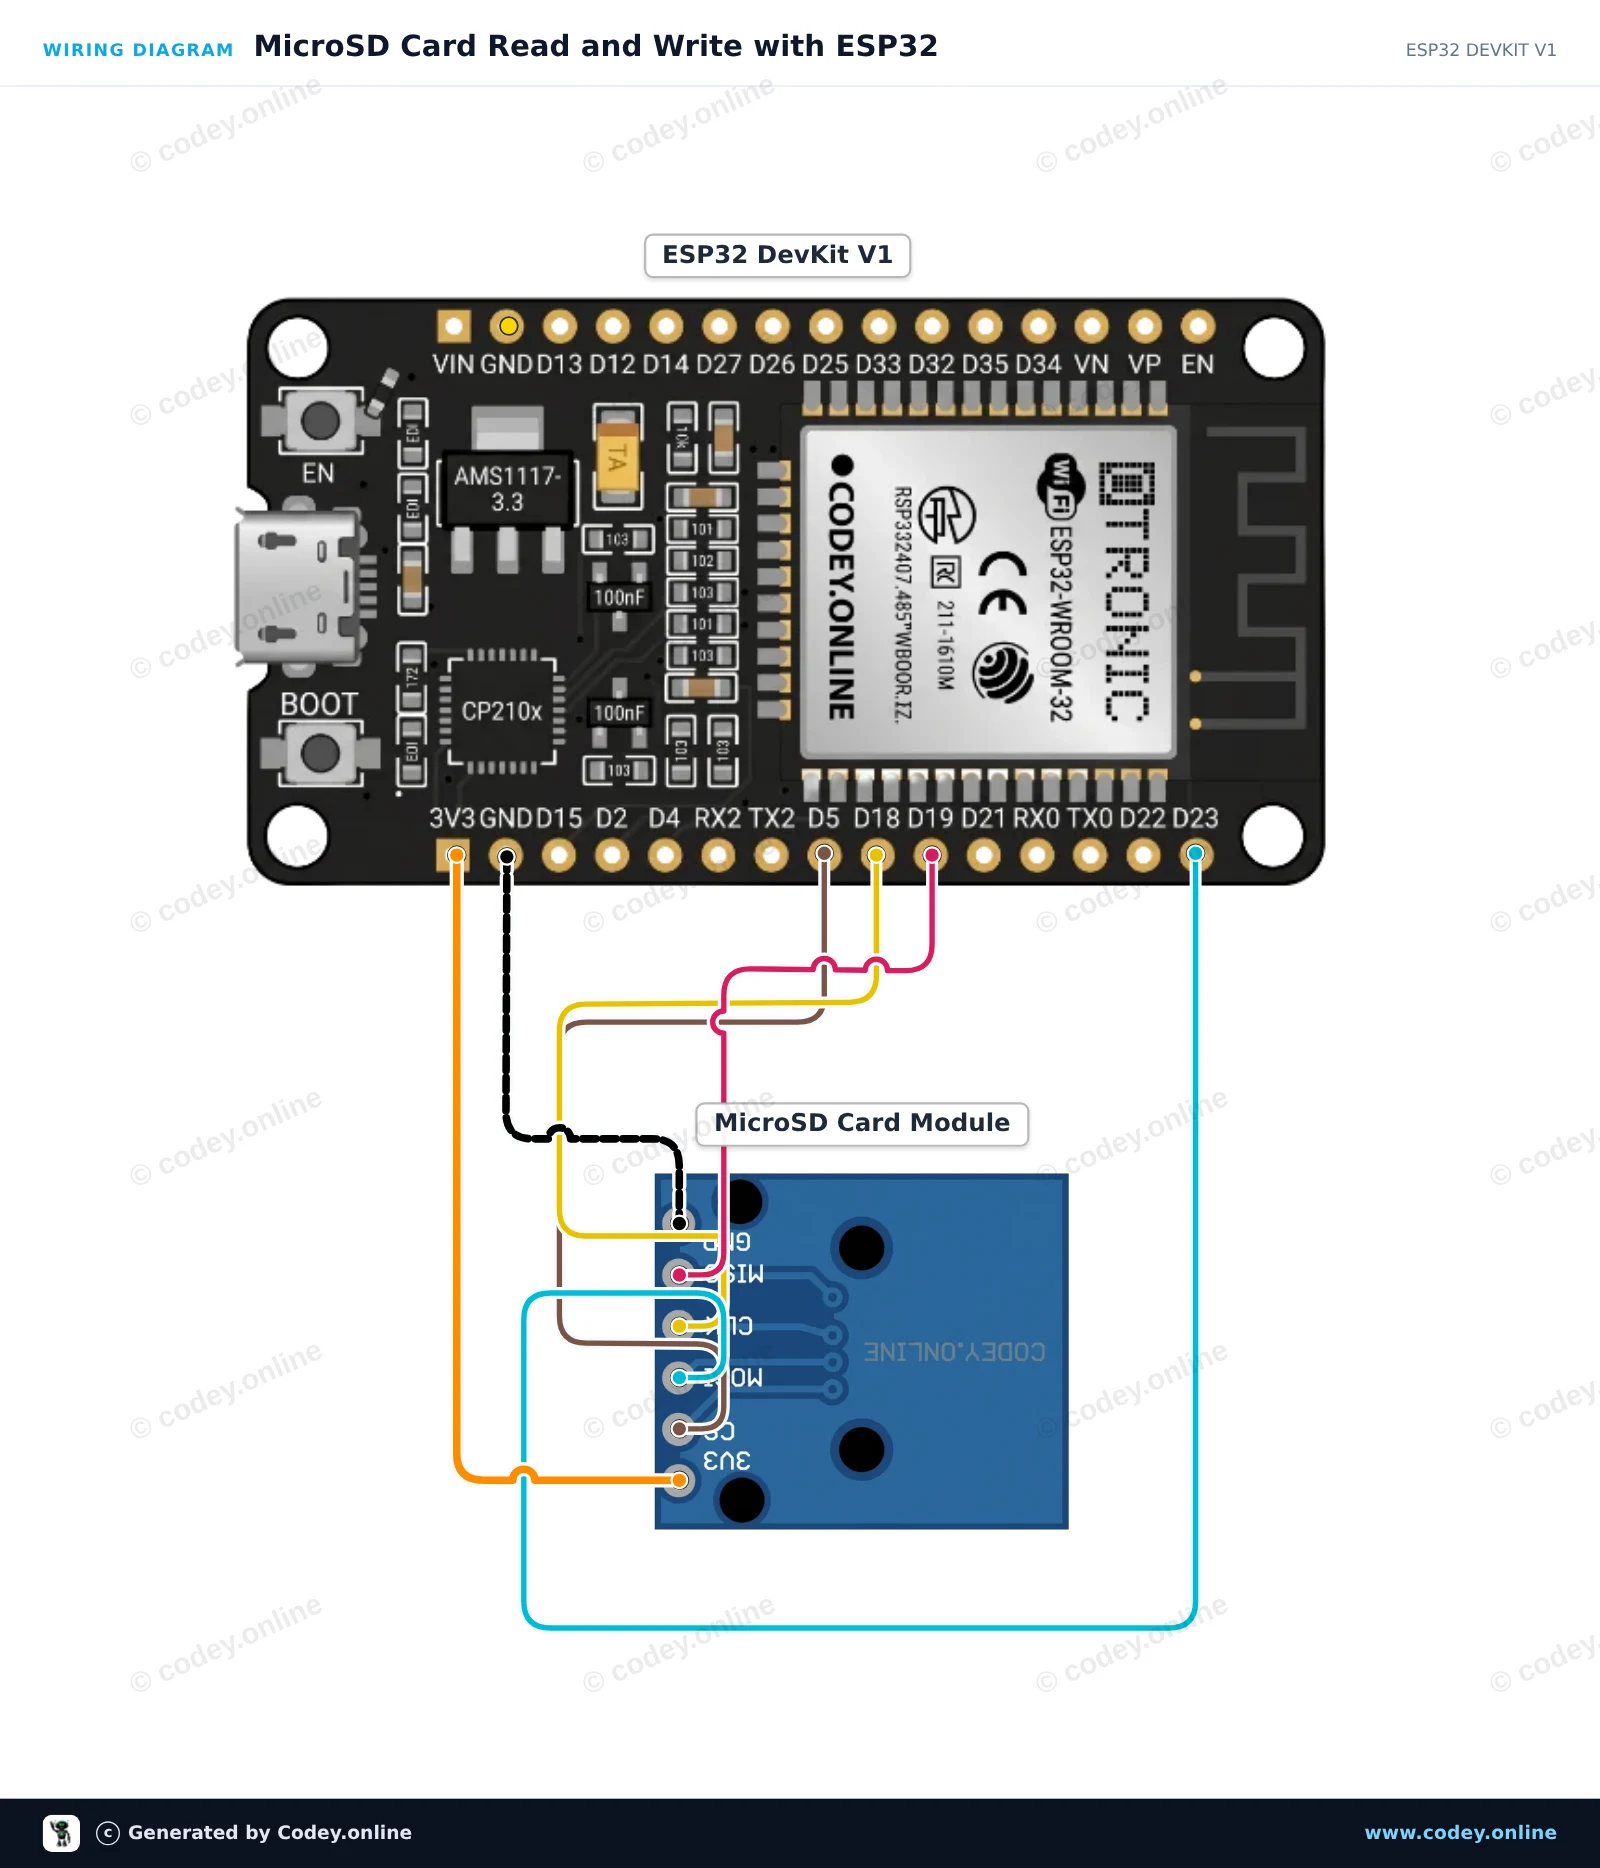
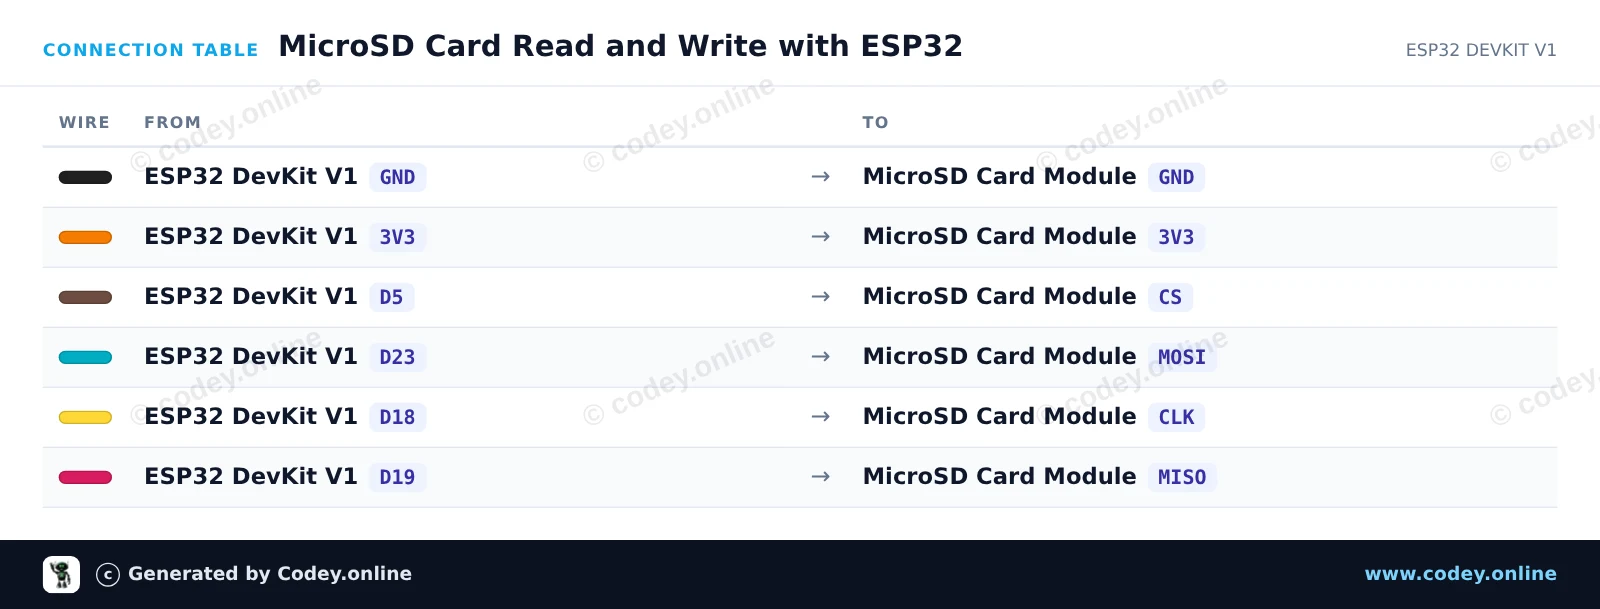
Dette eksempel viser, hvordan man forbinder et 3.3V MicroSD-kortmodul med ESP32 ved hjælp af den standard hardware-SPI-bus (VSPI). Sketch’en initialiserer SD-kortet, skriver en testbesked til en fil og læser den derefter tilbage for at vise den i Serial Monitor.
/*
 * ==================================================================
 *  Generated by Codey.online  —  https://www.codey.online
 * ==================================================================
 *  Project   : MicroSD Card Read and Write with ESP32
 *  Board     : ESP32 DEVKIT V1 (esp32:esp32:esp32doit-devkit-v1)
 *  Parts     : Micro SD Card Adapter Module 3.3V
 *  Libraries : none (built-in)
 *
 *  Codey Online is an AI-powered browser IDE for Arduino and ESP32.
 *  Describe your project and Codey writes the code, draws the wiring
 *  diagram and uploads it to your board, straight from the browser.
 *  This code is free to use, modify and share, without warranty.
 * ==================================================================
 */

#include "FS.h"
#include "SD.h"
#include "SPI.h"

const int chipSelect = 5;

void setup() {
  Serial.begin(115200);
  while (!Serial) { delay(10); }

  Serial.println("\n--- MicroSD Card Demo ---");

  // Initialize SD card on default VSPI pins (CS = GPIO 5)
  if (!SD.begin(chipSelect)) {
    Serial.println("Card Mount Failed! Check wiring and make sure card is FAT32 formatted.");
    return;
  }

  uint8_t cardType = SD.cardType();
  if (cardType == CARD_NONE) {
    Serial.println("No SD card attached.");
    return;
  }

  Serial.print("SD Card Type: ");
  if (cardType == CARD_MMC) {
    Serial.println("MMC");
  } else if (cardType == CARD_SD) {
    Serial.println("SDSC");
  } else if (cardType == CARD_SDHC) {
    Serial.println("SDHC");
  } else {
    Serial.println("UNKNOWN");
  }

  uint64_t cardSize = SD.cardSize() / (1024 * 1024);
  Serial.printf("SD Card Size: %lluMB\n", cardSize);

  // Write to a test file
  Serial.println("Writing to test.txt...");
  File file = SD.open("/test.txt", FILE_WRITE);
  if (file) {
    file.println("Hello from ESP32!");
    file.println("MicroSD read/write test successful.");
    file.close();
    Serial.println("Write complete.");
  } else {
    Serial.println("Failed to open file for writing.");
    return;
  }

  // Read back the test file
  Serial.println("Reading from test.txt:");
  file = SD.open("/test.txt");
  if (file) {
    while (file.available()) {
      Serial.write(file.read());
    }
    file.close();
  } else {
    Serial.println("Failed to open file for reading.");
  }
}

void loop() {
  // Nothing to repeat in this test
  delay(1000);
}Wiring diagram and example code generated by Codey.online — https://www.codey.online





 English
  Nederlands
  Frans
Frans  Deutsch
  Italiano
  Español
  Suomi
Suomi  Polski
  Ελληνικά
  Български
  Čeština
  Hrvatski
  Aileen